
Table of Contents
As automation and AI technologies continue to evolve, businesses are increasingly adopting chatbots to improve customer service, streamline workflows, and boost user engagement. Today’s chatbots are capable of advanced features like voice recognition and natural language processing, delivering human-like interactions. Amazon Lex, introduced in 2017, has been a pioneer in this space, and its upgraded version, Amazon Lex v2, launched in 2021, offers even greater functionality.
This guide demonstrates how to develop an advanced chatbot using AWS Lex, focusing on creating a digital assistant for IT management tasks—like automating the creation of a Virtual Private Cloud (VPC) with customized settings.
Overview of Amazon Lex
Amazon Lex v2 combines cutting-edge natural language understanding (NLU) and automatic speech recognition (ASR) to enable developers to create conversational AI solutions. Lex allows businesses to design dynamic, customized conversation flows tailored to their unique needs.
The foundation of Lex lies in the Bot, a collection of multiple Intents that represent specific tasks or conversation topics. These Bots can integrate with platforms like Slack and Microsoft Teams, support multiple languages, and allow versioning for enhanced flexibility.
Understanding Intents in Amazon Lex
Intents are individual components within a Bot, each addressing a specific function or interaction. For example, in an IT assistant chatbot, you might have an Intent called “Create S3 Bucket” that processes user requests to create an Amazon S3 Bucket.
Exploring Slots in Intents
Within each Intent, Slots capture user-provided details needed to complete a task. For instance, if a user requests, “I need a private S3 bucket named ‘webbycloud-bucket-9999,’” Slots can extract:
- Bucket Type: “private”
- Bucket Name: “webbycloud-bucket-9999”
By leveraging Bots, Intents, and Slots, Amazon Lex v2 enables developers to create sophisticated chatbots capable of handling complex user inputs and automating tasks.
Prerequisites
To implement an Intent for creating an S3 bucket, a Lambda function will act as the “cloud glue.” This guide focuses on chatbot creation rather than Lambda coding. However, a pre-written Lambda function is provided for those following along.
Python Lambda Function Code
Below is the sample Lambda function for creating an S3 bucket:
import boto3
def close(session_attributes, active_contexts, fulfillment_state, intent, message):
response = {
‘sessionState’: {
‘activeContexts’:[{
‘name’: ‘intentContext’,
‘contextAttributes’: active_contexts,
‘timeToLive’: {
‘timeToLiveInSeconds’: 5,
‘turnsToLive’: 1
}
}],
‘sessionAttributes’: session_attributes,
‘dialogAction’: {
‘type’: ‘Close’,
},
‘intent’: intent,
},
‘messages’: [{‘contentType’: ‘PlainText’, ‘content’: message}]
}
return response
def creatingS3(intent_request):
bucket_name = intent_request[‘interpretations’][0][“intent”][‘slots’][‘BucketName’][‘value’][‘interpretedValue’]
bucket_privacy = intent_request[‘interpretations’][0][“intent”][‘slots’][‘BucketPrivacy’][‘value’][‘interpretedValue’]
bloc_public_access = True if bucket_privacy == “private” else False
s3_client = boto3.client(“s3”)
s3_client.create_bucket(
Bucket=bucket_name,
CreateBucketConfiguration={‘LocationConstraint’: ‘eu-central-1’}
)
s3_client.put_public_access_block(
Bucket=bucket_name,
PublicAccessBlockConfiguration={
‘BlockPublicAcls’: bloc_public_access,
‘IgnorePublicAcls’: bloc_public_access,
‘BlockPublicPolicy’: bloc_public_access,
‘RestrictPublicBuckets’: bloc_public_access
},
)
session_attributes = intent_request[‘sessionState’].get(“sessionAttributes”) or {}
intent = intent_request[‘sessionState’][‘intent’]
active_contexts = {}
message = ‘S3 Bucket Successfully created’
intent[‘confirmationState’] = “Confirmed”
intent[‘state’] = “Fulfilled”
return close(session_attributes, active_contexts, ‘Fulfilled’, intent, message)
def dispatch(intent_request):
intent_name = intent_request[‘interpretations’][0][“intent”][‘name’]
if intent_name == ‘create-an-s3-bucket’:
return creatingS3(intent_request)
raise Exception(‘Intent with name ‘ + intent_name + ‘ not supported’)
def lambda_handler(event, context):
return dispatch(event)
Building the Chatbot
- Log into AWS Console: Navigate to AWS Lex and ensure you’re using the latest version. Switch to Lex v2 if necessary.
- Create the Bot:
- Name the Bot, e.g., “digital-assistant.”
- Select “Create a role with basic Amazon Lex permissions.”
- Set the session timeout to 1 minute.
- Choose English as the language.
Setting Up Intents
After creating your Bot, define specific tasks it will handle using Intents:
- Navigate to Intents: Open the Bot in AWS Lex, and go to the “Intents” section.
- Create an Intent: Name it, e.g., “create-an-s3-bucket.”
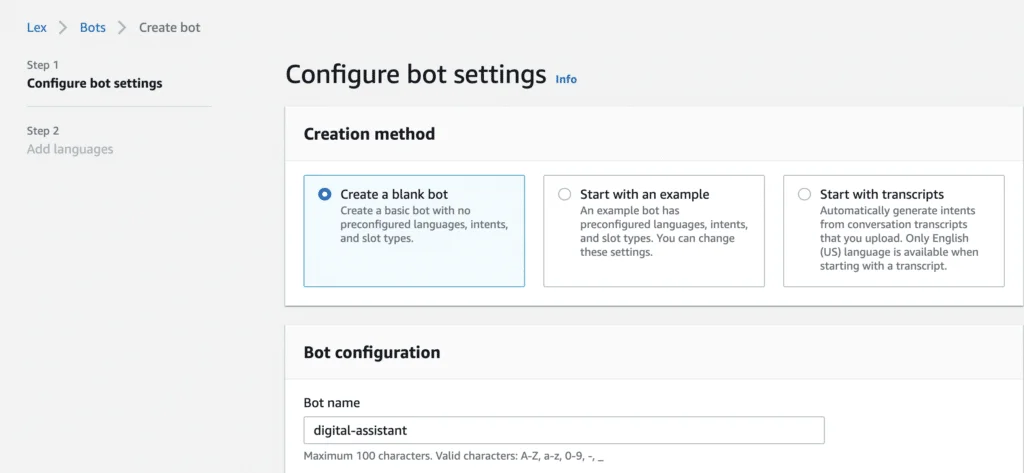
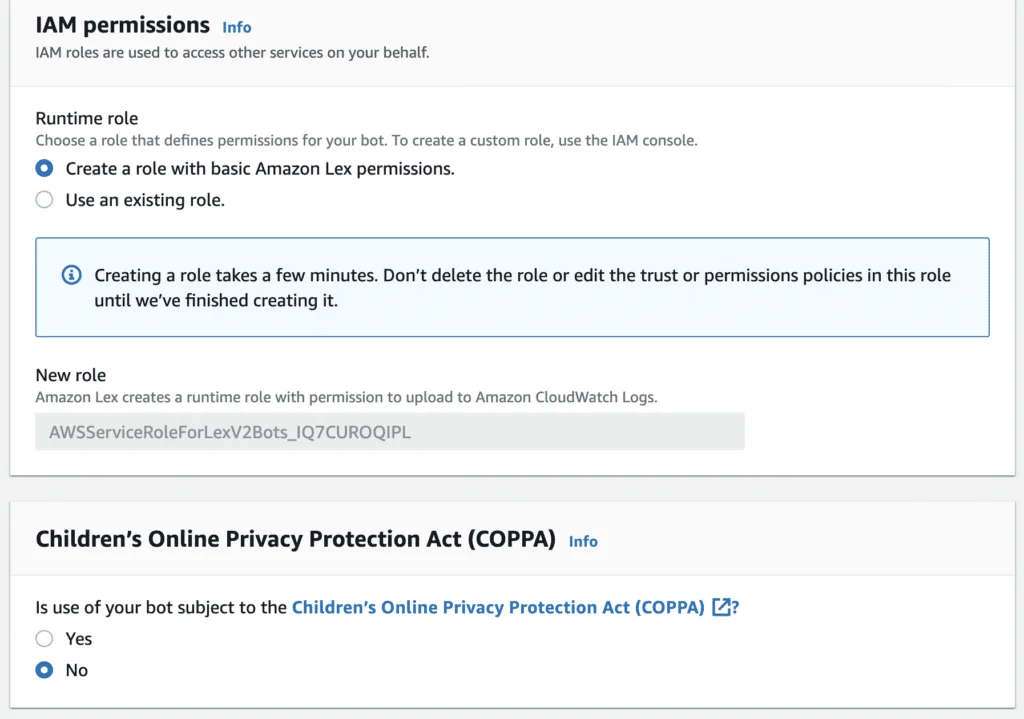
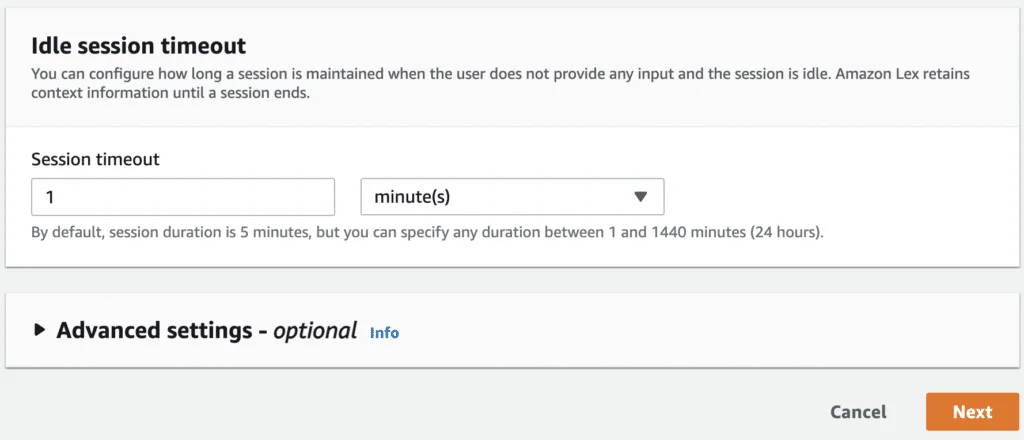
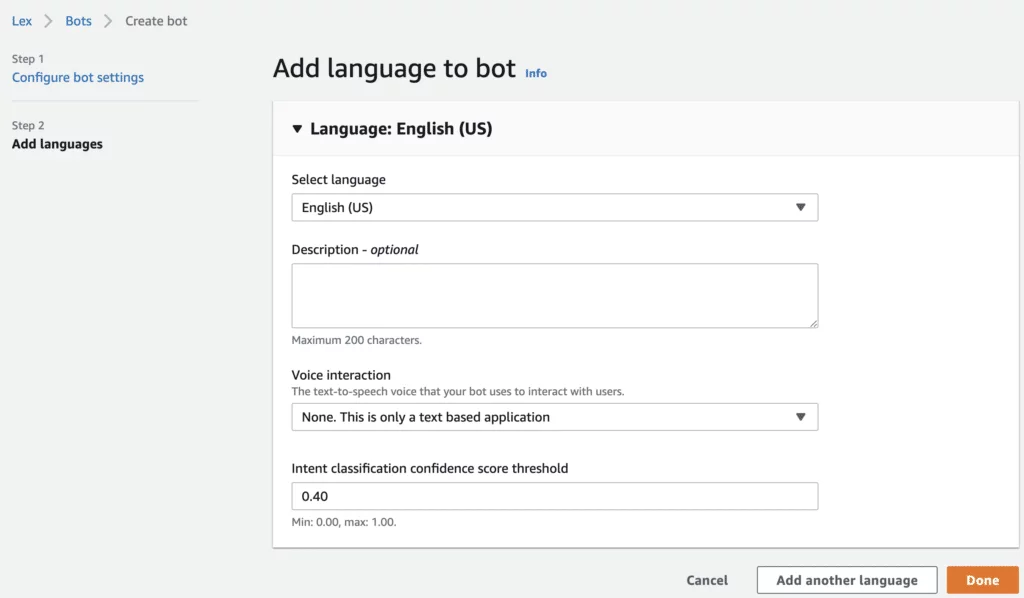
3. Click on the Done button!
Creating the Intent
1. Click on the “Create a new intent” button.
2. Ensure that the intent name is create-an-s3-bucket (this is important because the Lambda function relies on this property).
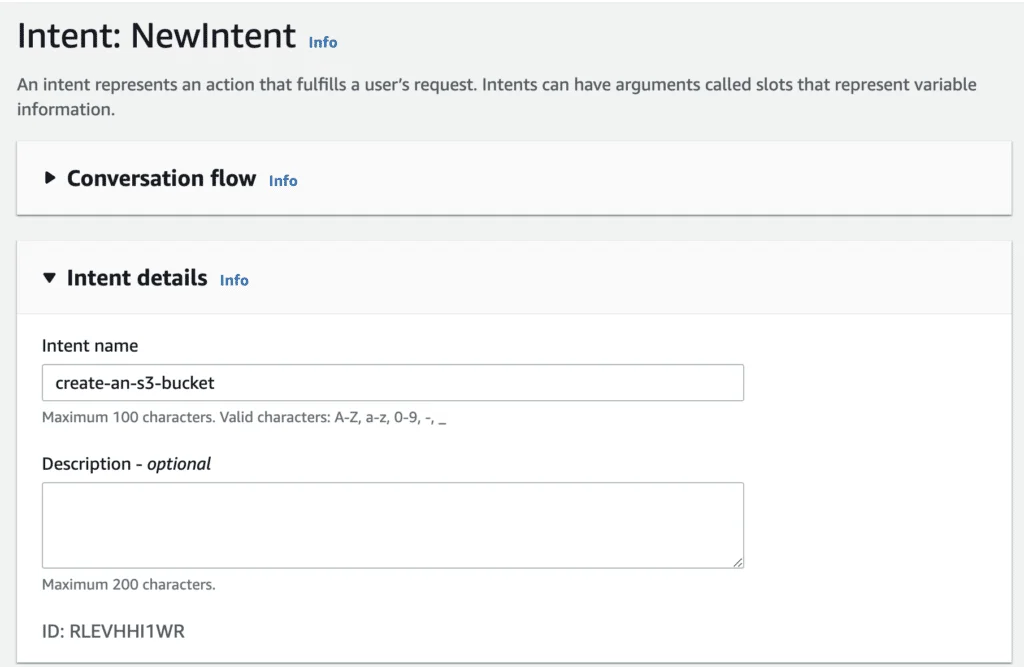
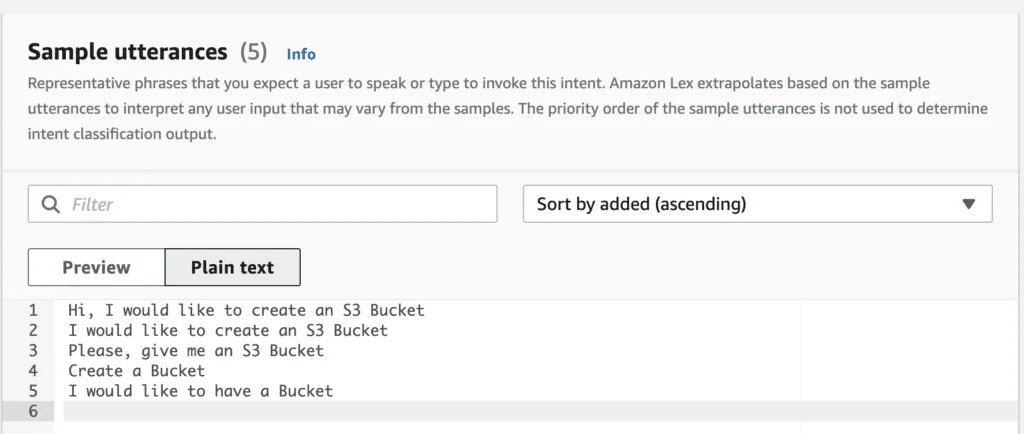
3. Create sample utterances that serve as the basis for training the model.
- The more examples you provide, the more accurate the results will be. These can be in the form of text-based questions.
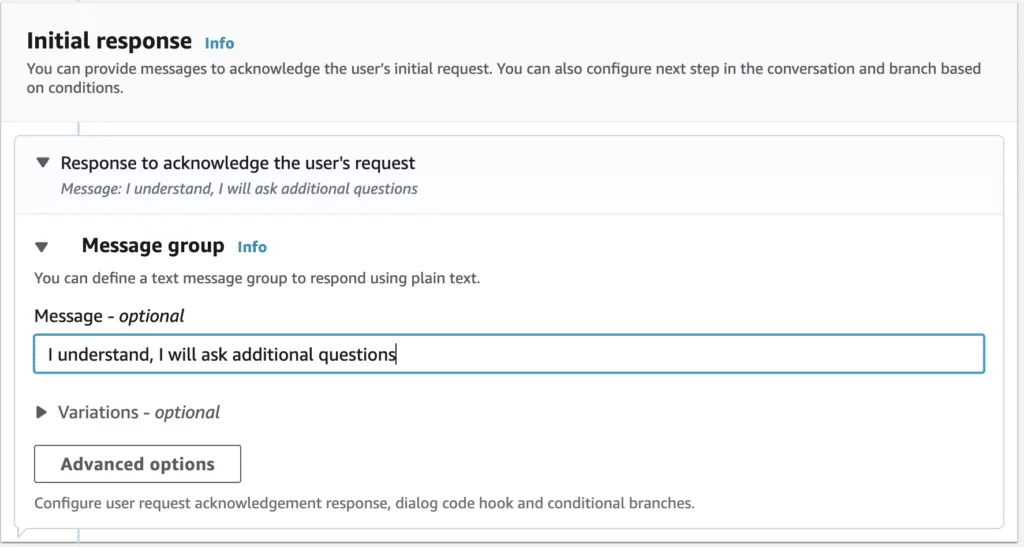
4. Fill in the message section of the Initial Response Tab. Be creative with the content.
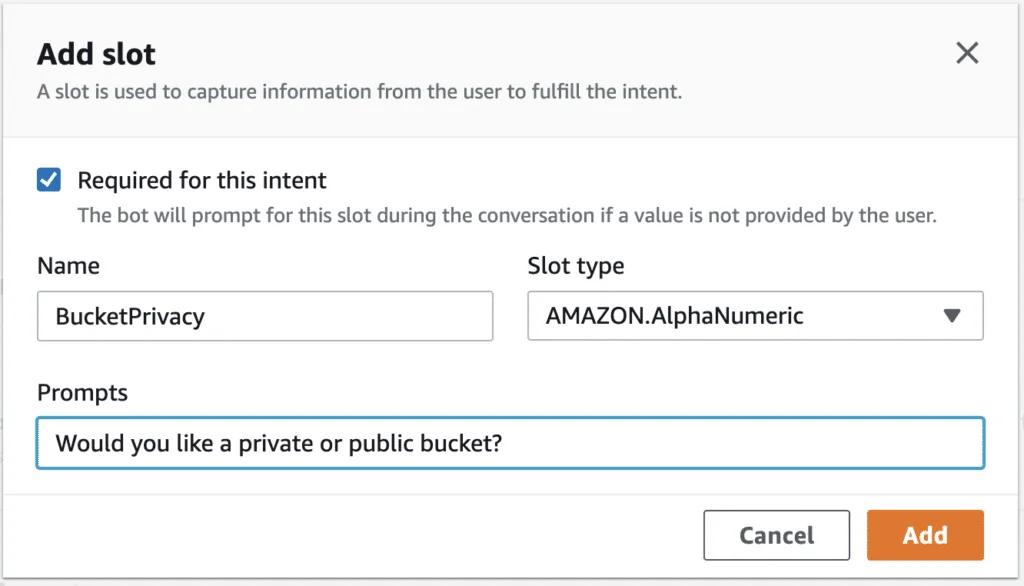
5. Now, it’s time to add Slots to the Intent. In this example, we will create a select option where the user will be prompted to choose between creating a public or private bucket.
- Add a slot with the following details:
- Name: BucketPrivacy
- Slot Type: Amazon.AlphaNumeric
- Provide a creative prompt for this slot.
- Once the slot has been created, you need to make some modifications. Go to the Slot settings and click on the advanced options.
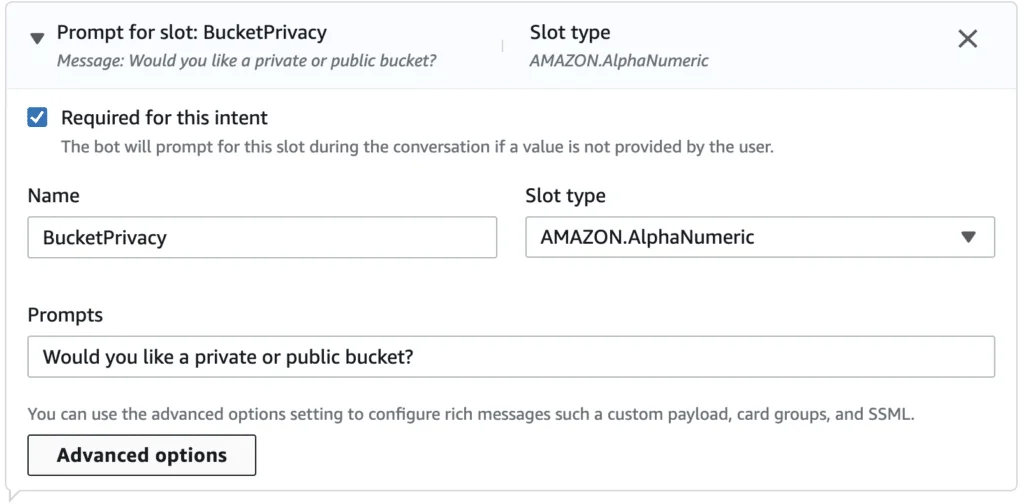
- In the advanced options, click on “More prompt options.”
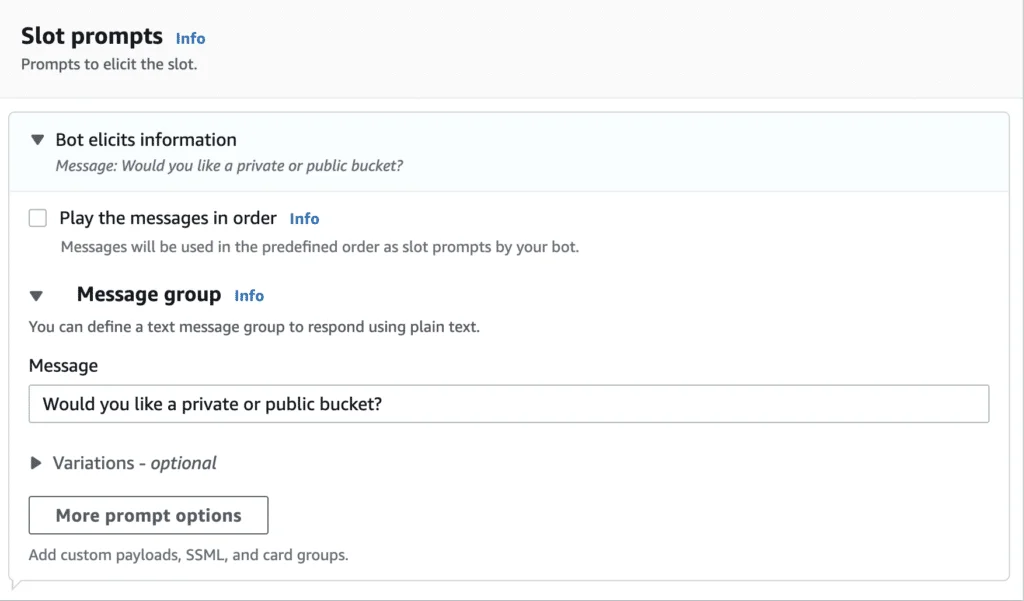
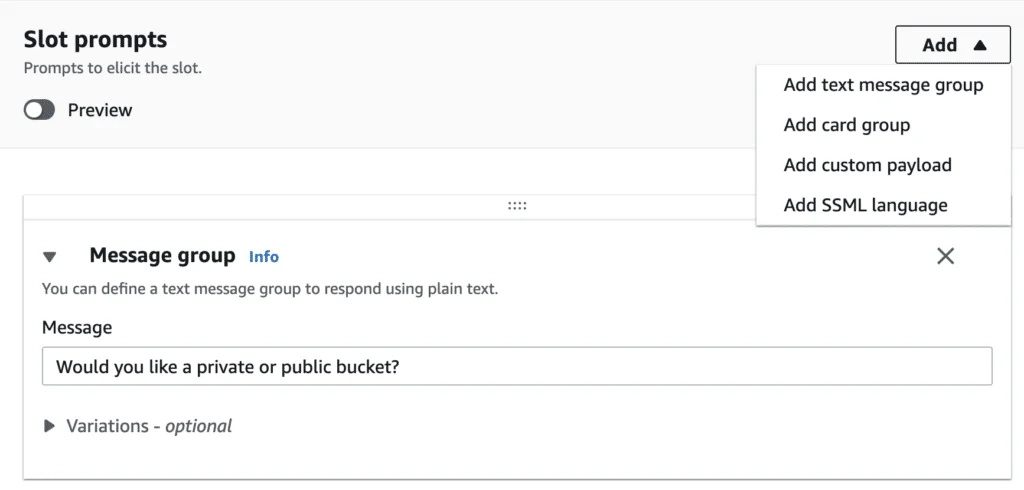
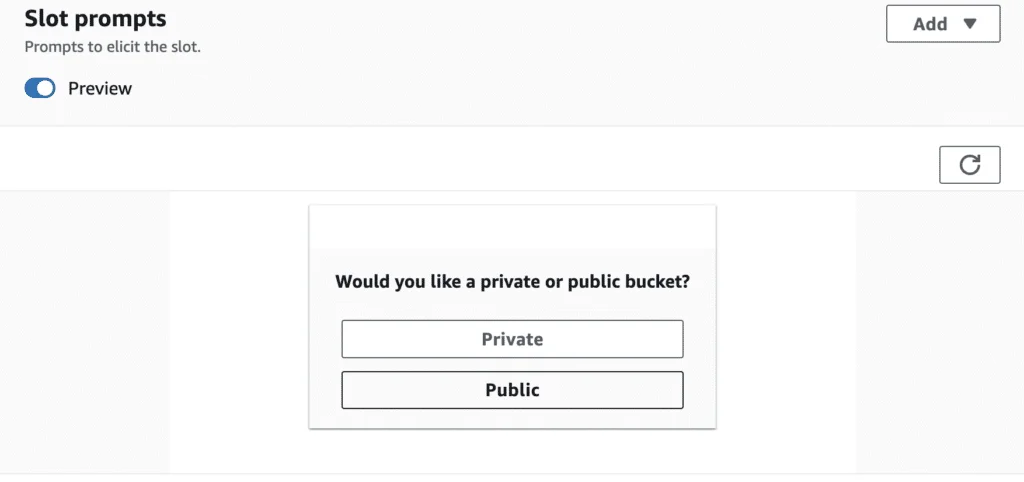
- Add a Card Group.
- Provide a title for the Card Group and fill in the buttons as shown below.
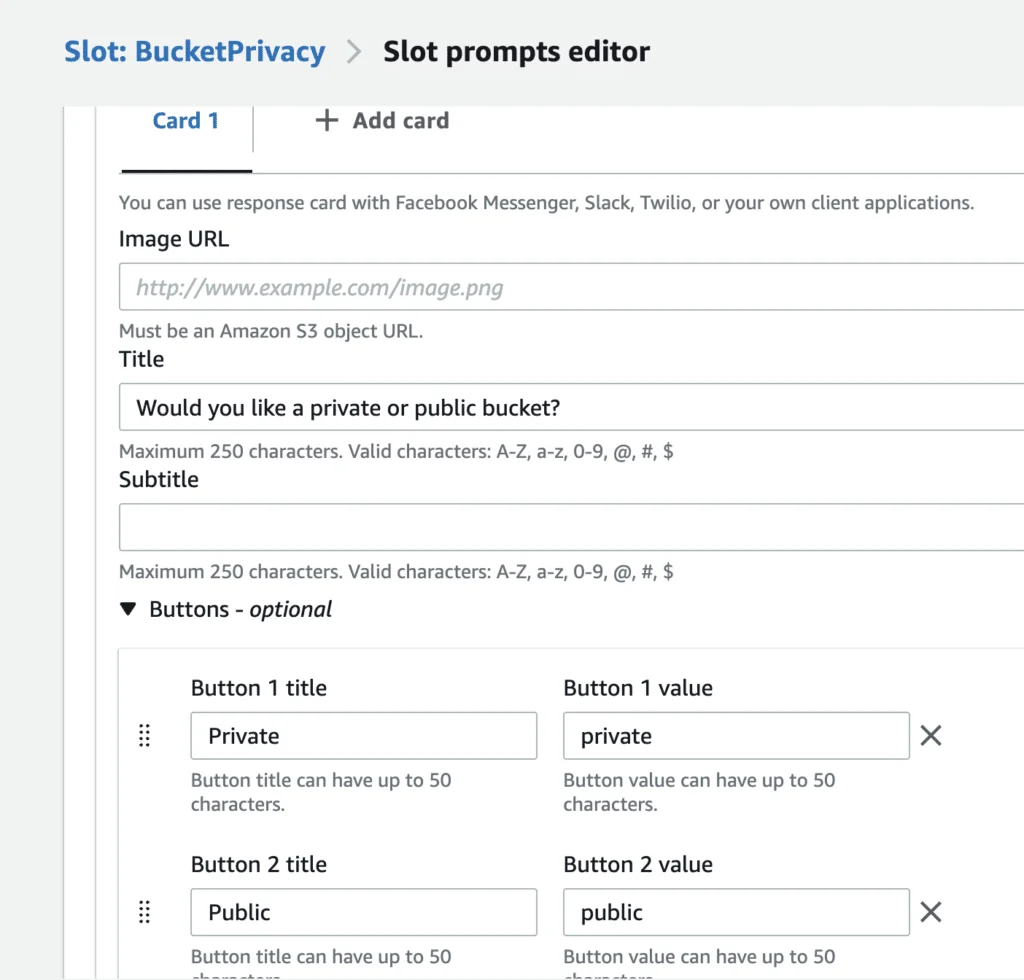
- Preview the changes, and you will see a beautifully rendered select option:
- Now, let’s create the second slot, which can be a traditional message.
- Add a slot with the following details:
- Name: BucketName
- Slot Type: Amazon.AlphaNumeric
- Provide a creative prompt for this slot.
- Add a slot with the following details:
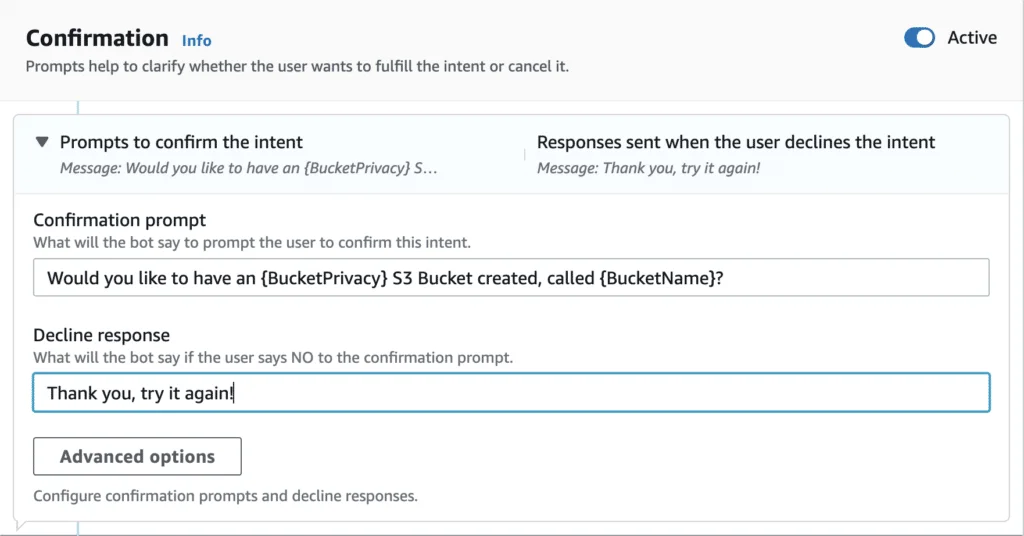
- Next, add the Confirmation Section of the Intent.
- See below for an example of how to reference the slot values: {BucketName} and {BucketPrivacy}
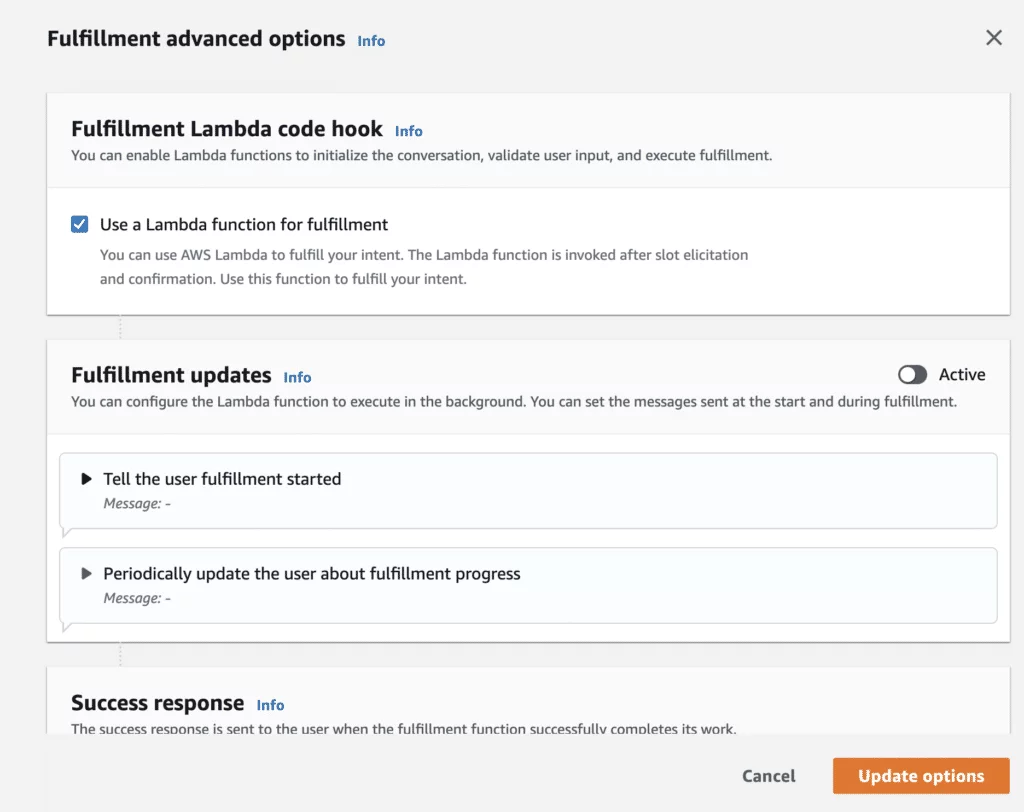
- Finally, let’s complete the Fulfillment section:
- Fill in the possible message section of the fulfillment for the Intent.
- Click on the Advanced options and enable the Use a Lambda function for fulfillment option.
- Interestingly, the selection of the actual Lambda function can be done in a separate interface.
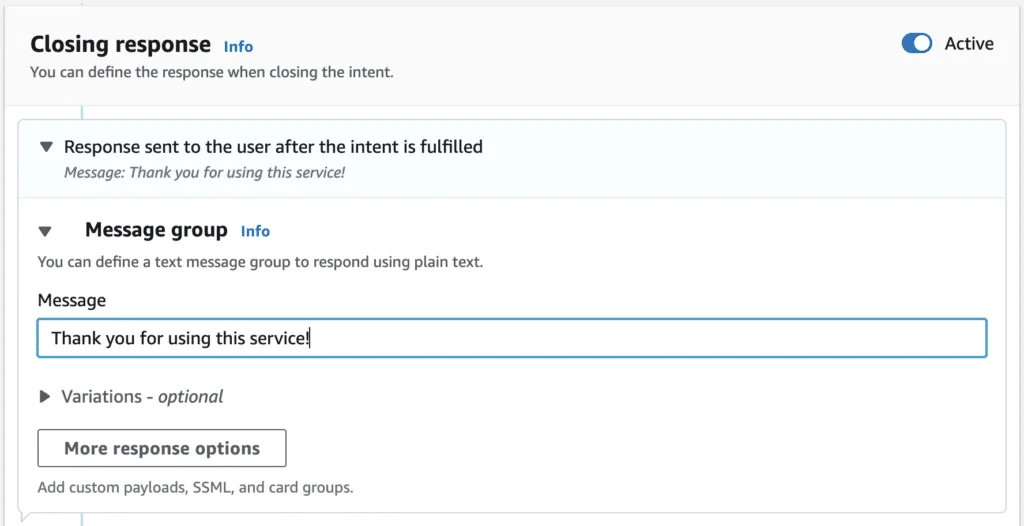
- Lastly, the Intent should have a Closing Response.
- Feel free to be creative, as shown in the example below.
- Build the Bot.
- Look for the large “Build” button in the top right corner of the screen, and click on it. This process may take a few seconds to complete. (Remember to perform this step, as the Intent won’t work without it.)
Selecting the Appropriate Lambda Function
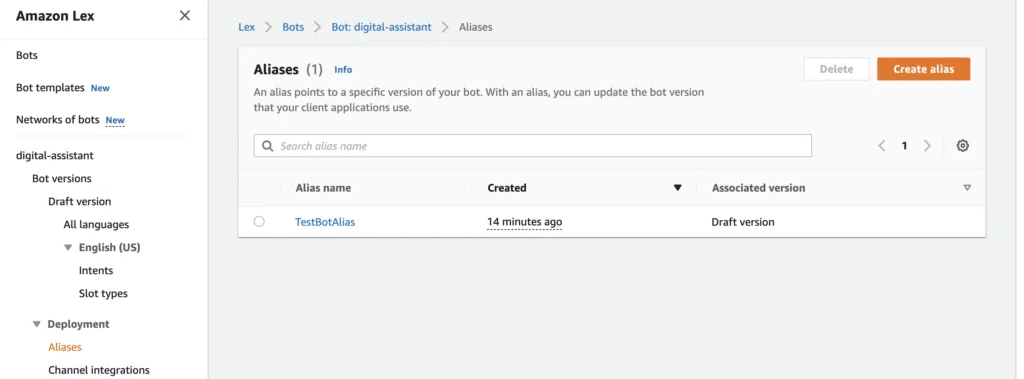
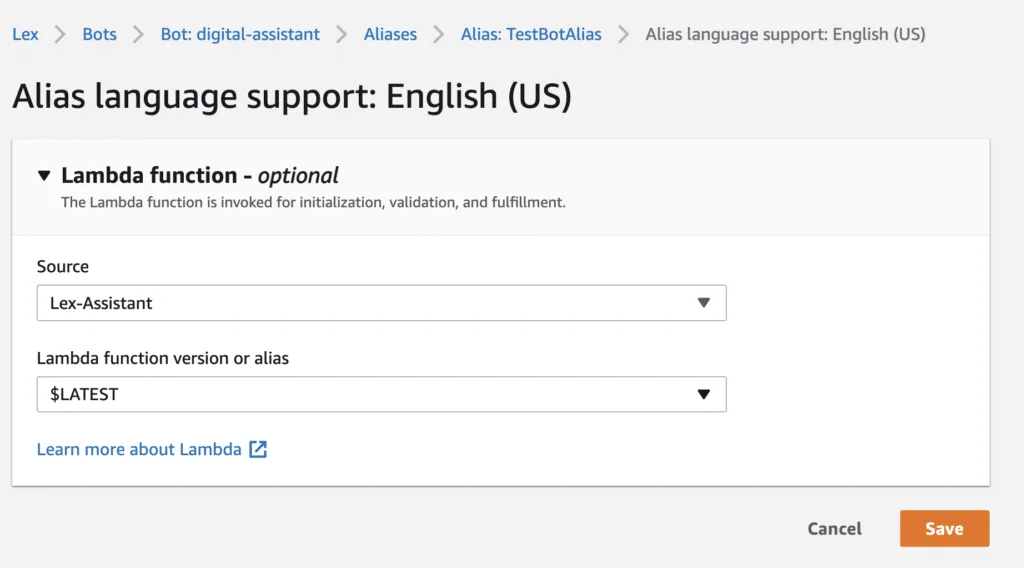
This section can be a bit tricky. It’s important to note that a single Bot can only be associated with one Lambda function using Lex V2. However, there are strategies to overcome this limitation.
Every Bot has aliases, and by default, a single alias called TestBotAlias has been created. For now, we can work with this alias.
1. Click on the Alias.
- Build the Bot.
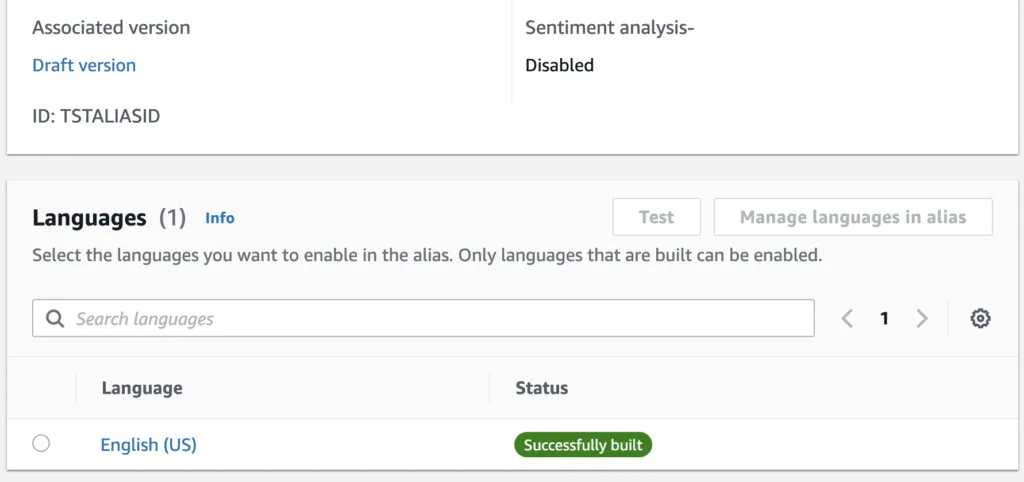
- 2. Select the Language (English).
- 3. Now, you have the option to choose the Lambda Function associated with the Bot.
Testing the Bot
- Navigate back to the Intent that you created.
- Click on the prominent Test button located in the top right corner.
- Engage in a fruitful conversation with the Bot, as shown in the example below:
You will notice that the prompt will ask for the necessary details. Trust me, I have already created the Bucket for myself. See the example below:

Summary
In this guide, we explored the fundamentals of using Amazon Lex and how it leverages managed machine learning (ML) services provided by AWS. This simplifies the development process, removing the need to train custom ML models or establish complex ML pipelines.
We delved into key components of Lex, including different Slot types, the integration of a Lambda function for task fulfillment, and the process of referencing slot values within a Confirmation message.
Understanding the hierarchy of Lex components is essential for building effective chatbots:
- A Lex Bot acts as the primary structure, housing multiple Intents.
- Each Intent can include several Slots, which capture user-provided data.
- A single Lambda function can be linked to an alias or specific language configuration of the Bot.
By following this guide, you’ve learned how to utilize Amazon Lex for creating intelligent chatbot applications while taking advantage of its advanced natural language understanding (NLU) and speech recognition features. This knowledge equips you to build seamless, scalable, and efficient conversational interfaces